Got new Toyota Sienna floor mats but cannot decide how to place each liner in its respective position? If so, you have made it to the right place.
This blog helps you to install Toyota Sienna floor mats so that no footwell remains uncovered.
Let’s get straight into it.
Identify Floor Mats for Each Row and Seat
Sienna has three rows and 7 – 8 seats. It is important to find a floor liner for their respective position right after you unbox them. For doing so, the manufacturer of the mats got your back. They label the liners for the position.
Grab the instruction manual and check the labeling. In one column you will find the part numbers which will also be labeled on the back side of the mats. Each part number will have a respective position mentioned in the next column – Left-hand side, right-hand side, passenger, driver’s side, or first and second row.
You can also identify each mat for its position by just inspecting them. Some floor liner brands may have labeled the mats differently, so try to understand them and place the mats in their position.
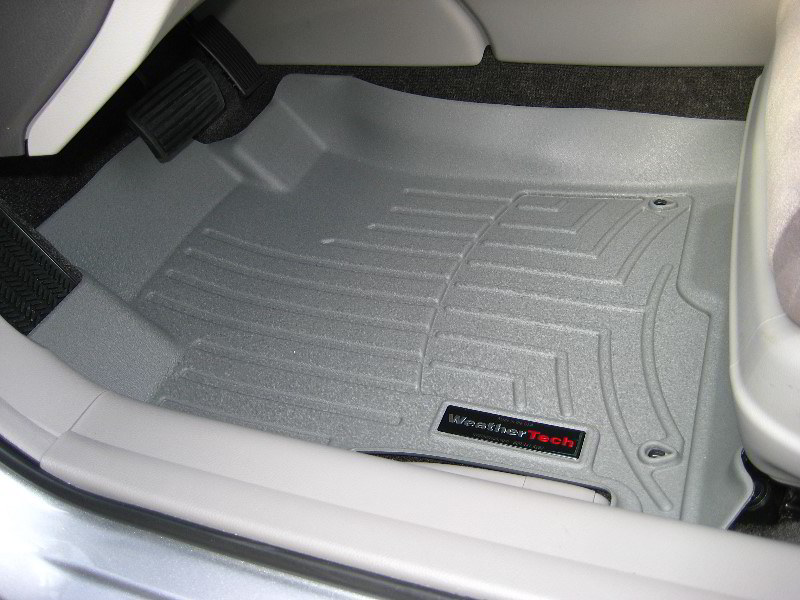
Installing 1st Row Toyota Sienna Floor Liners
Now that you have found which mat goes where let’s place them in their position. In the first row, you need two mats. One for the driver’s side and the other for the passenger side. Before installing the new mats, remove the old mats or OEM mats.
The factory mats would have been fastened by the retention device. So rotate or twist the hook counterclockwise and displace the liners. The retention system might be different depending on the car model.
After removing the old floor liners, clean the carpet with a vacuum if possible. Then move the front seat to its most backward position so that you have more room for the installation.
Now put the new mat on the driver’s side. To the padel side, slide the mats beneath the accelerator, gas pedal, clutch, and brake. They should be above the mat. Then insert the hook or grommet so that the mats do not move.
Move the seat to its original position. And also do a small check with the pedals to whether they can be pressed to their full extent or not.
The same method goes for the first-row passenger-side floor liners.
Installing 2nd Row Car Mats
Installing floor liners in the second row of your Sienna is a little trickier. Because the mats for the row are manufactured either in two pieces or four. You can easily place the two-piece floor mats in their positions. One will go for the LHS and another for the RHS.
The problem comes with the four or more piece mats for this row. With this package, you get two long narrow strap-like mats, which are attached to a big mat in the two-piece mats. These narrow and long mats go on each side near the doors. And the remaining two should be placed in the middle.
The mats for the second row have little lips at the outer edge which go under the trim or seat adjustment mechanism for a safe and secure grip. If you cannot tuck the mats underneath the trims with your bare hands, use a shoehorn. Some brands even ship a tool like a shoe horn with Toyota Sienna floor mats.
In this case, try to slide the rear seats to their backward positions and the front seats forward. You will get more space this way. Once the mats cover the contouring completely, fasten them using the retention device – hook, clip, or grommet.
Installing 3rd Row Floor Mats
This row is easier. Just install the two-floor mats in their respective position – RHS and LHS. You will also need to move the rear seats forward to gain some space.
Related: Best Floor mats for Toyota 4runner
To-do List Prior to Installing Sienna Floor Mats
A few small steps before installing new floor mats are:
- Remove the previous, OEM, factory mats. Because new mats are designed for installation on the floor, not on top of the mats.
- Clean the carpet with a vacuum or hands.
- Remove all the debris and dirt.
- Do not remove the carpet under the mats which are factory-made and cannot be removed
Floor Liners Retention System in Toyota Sienna
The mats should be placed in such a way that the snaps in the mats come over the factory clip posts on the floor or center the caps of the mats over the retention system posts. And snap them down until you hear a sound.
Most Toyota models have twist floor mat retention systems. This means you will need to rotate the clip 90 degrees for installing or removing the mats.
The retention hooks or fastening clips or anchors should be from the car manufacturer or installed in the ones that come with the mats. Some brands deliver them as well with the mats. You can buy them separately as well.
The retention system prevents the mats from moving forward or backward. Also, some vehicle models have hooks on the driver’s side only.
Related: 3 Best Floor Mats For Land Cruiser
General Infos about Choosing and Installing Toyota Floor Mats
- Choose all-weather floor mats
- The liners should come under the pedals, not over the pedals.
- Choose the vehicle-specific floor mats for your Toyota Sienna
- Trim-to-fit mats are also an option but the floor mats that are designed for a specific car model are preferred for the perfect fit to the contour of the vehicle
- Press the pedals to the full range to see that you have no problem with that.
- Do check the position of the mats after service or cleaning
Can You Install Floor Liners Over the Factory/Old mats?
No, you cannot install floor liners over the factory or old mats. It is not recommended. It may come in the way of the pedals and they may not go to their full extent. Therefore, use a one-floor mat and remove all of the previous mats.
Video Guide for Installing Toyota Sienna Floor Liners
Bottom Line
Now that you know how to install Toyota Sienna Floor mats that cover the footwells completely. It is a simple task and takes a few minutes. Try to follow the instruction manual and place each mat in its position. You can find their position by just inspecting them as well.